|
|
|
|
|
|
|
|
JFC
Real
Time Target
The JFC Real Time Target
Indicator (JFC RTT) is quite possibly the most consistent trading tool you will
encounter.
The
prime use for this tool is to predict an accurate, highly reliable point for
exiting a trade.
Each
day you can use this indicator to give you an exit target for the trades you
have entered using the Major and Minor Trend indicators.
My
research has shown that the trading techniques described in this course can be
greater than 80% accurate in predicting the proper direction and positioning for
each day’s trade.
This
same research tells us that the JFC RTT Indicator is equally, if not greater
than, that same 80% accuracy in directing the trader to an attainable target for
each trade.
As
with all the tools in this package, the JFC RTT indicator comes equipped with
user selectable inputs which allow the trader to adapt the indicator not only to
the contract or stock issue being traded but also to closer match the individual
trading style of the trader.
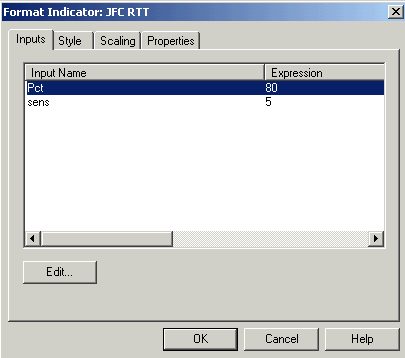
The
two inputs for this program work together to adjust the sensitivity of the
indicator. In all instances, the smaller
the two numbers, the more sensitive the indicator.
The
appropriate range of values for the PCT input will fall between 60 and 120 with
the default set at 80. Any number can be used here, including both whole numbers
and decimal values. This input value adjusts your indicator to project a
percentage of the maximum calculated target for the day for the contract or
stock issue in question. Thus, you are able to alter the target to fit your own
trading style and risk tolerance level.
It
is often useful to plot this indicator more than one time on an individual
chart. The advantage to this technique is to plot various target values on the
same chart so the trader can observe the action of the market in question as it
approaches the various target levels.
To
create this diagnostic plot, apply the indicator a second time to the same
chart, picking alternate colors for the two target lines which are plotted.
Also, choose different sensitivity (SENS) and percent (PCT) inputs for the
second, and even the third plot for this indicator.
With
the various settings for this tool, each differently color coded on your chart,
you will readily be able to observe the market’s reaction to selected input
values and then be able to choose the input values most appropriate for the
contract or stock issue you are following.
The
range of workable values for the SENS input will be between 3 and 20 with the
default set at 5. Any number is acceptable here, including whole numbers and
decimals. It is suggested however that decimal values be avoided here for most
consistent results.
The
construction of this indicator is quite complex and therefore requires
considerable prior data to plot its daily target projections. The amount of data
required for the accurate target determinations will increase as the number for
the SENS input increases.
It
is therefore important for the user to include sufficient data on the working
chart, as the indicator will not function or plot its target projections if
sufficient data is not available. If
you increase the setting for the SENS input and discover that the target plot
is no longer present on your chart, increase the amount of data available to
the indicator by adding more days to your working chart.
It is suggested that at
least 30 days of back data be included in your charts to give the indicator
sufficient data with which to make its target projections.
The
JFC RTT indicator is also one which makes use of self-adaptive
technology. You will note when using this indicator that the target projections
will make self-adaptive adjustments during the trading day. This is not a flaw
in the programming but a feature of its self-adaptive nature as the indicator is
constantly adjusting its target projection as directed by current market
conditions.
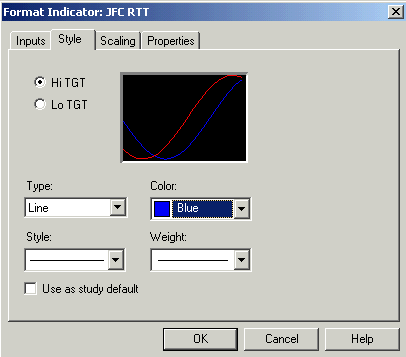
In
keeping with our color code convention, which associates blue with a long trade
and red with a short trade, The JFC RTT indicator is defaulted as blue for the
high target, where you would exit a long trade, and red for the low target,
where you would exit a short trade. You may of course alter the colors of the
plots to fit the color scheme on your chart.
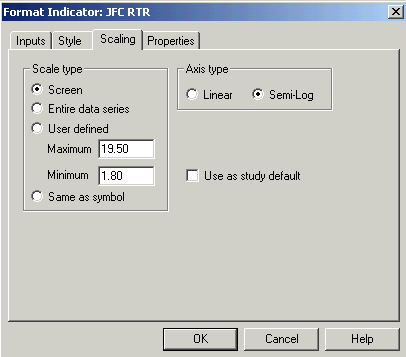
Scaling
for the JFC RTT indicator must always be set to Same as price data. Changing this
setting will create a plot which is totally useless in predicting a target for
your trades.
Properties
The JFC RTT Indicator
properties screen should be set to place the target indicator in Subgraph one,
which is the same graph in which you will find your price charts.
There is an alert programmed into this indicator which will notify you when the market crosses either the high or the low target line. It may be disabled by clicking the “Enable Alert” box above which will remove the check from the box.
Objective
Like many ideas and
tools discussed in the Four Steps Trading Course, the JFC RTT Indicator works
with the idea of range formation and range expansion.
You have probably heard
many times the expression that markets have their own individual
“personalities”. Part of this personality profile is how much the market in
question feels “comfortable” moving in any given day.
Much analysis has been
conducted over the years by many traders in an attempt to identify an average
amount that a market is likely to move throughout the trading session. I have explored this idea in
my own research for many years and have
found there are two basic ways to approach the problem:
1.
Arrive at a rigid mathematical average and apply this average into the
future. For example, market “X” moves an average of 25 point per day over
the last 100 days.
2.
Analyze price activity within a flexible self-adaptive environment which
will take into account factors such as increases or decreases in market
volatility and incorporate these changes into the base equation which generates
the value
The problem with the
first scenario is that, as you are well aware, markets change and there is no
guarantee that a rigid value will be usable in the future.
The JFC RTT is therefore designed using the second option. The result is a powerful tool that allows the trader to explore many variables of range formation and work with a target tool that identifies a price zone that has a high probability of being the high or low of the trading day.
Observation
and Interpretation
The following charts will demonstrate the use of JFC RTT as single and multiple plots. Again, I wish to stress the importance of studying the videotape information provided regarding this indicator. Viewing this material with give the trader the knowledge needed to use the full potential of this unique tool.
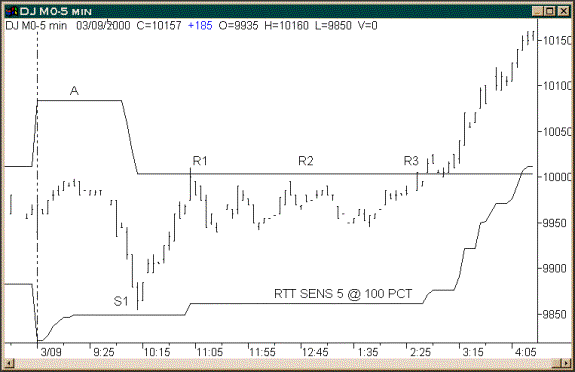
The chart on the
preceding page is a 5-minute bar chart of the DOW Futures Contract with the JFC RTT applied. The inputs setting on the chart are a SENS 1 setting of 5 and a PCT
setting of 100.
The indicator is
therefore set to a sensitivity of 5 and is using 100% of the generated
calculation.
The two lines labeled
“A” on this chart are the upper and lower targets plotted by the indicator.
Notice the support
found at S1, the rally from this low and the subsequent resistance experienced
at R1, R2 and R3. Notice also how at R3 the market succeeds on its third attempt
and breaks through the resistance as identified by the JFC RTT Indicator.
The JFC RTT in the case pre-anticipated two price zones which provided excellent exit targets.
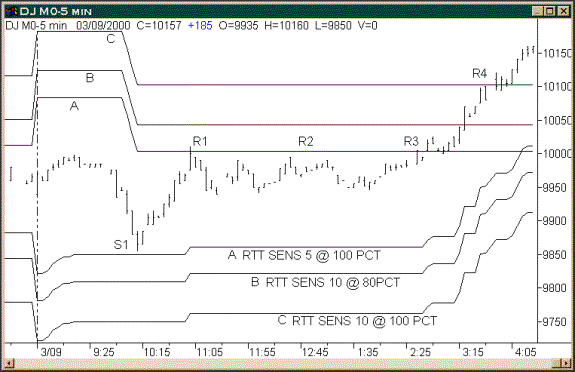
The above chart is the
same trading day as the first chart example.
This chart however has
the JFC RTT Indicator plotted three times with each plot using different input
settings. They are plotted with Line “A” having the most sensitive settings
and with Line “C” having the least sensitive.
·
The first plot as indicated at line “A” is the same as the
previous chart with a SENS 1 input setting of 5 and the PCT input at 100.
·
The second plot as indicated at line “B” is JFC RTT plotted
with a SENS 1 input setting of 10 and the PCT input at 80.
·
The third plot as indicated at line “C” is JFC RTT plotted with
a SENS 1 input setting of 10 and the PCT input at 100.
Notice how the market also encounters resistance and eventual support at R4 of Line “C” for approximately 30 minutes, after which time the rally continued into the close.
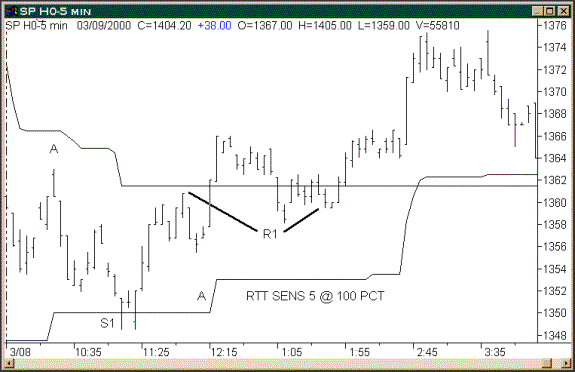
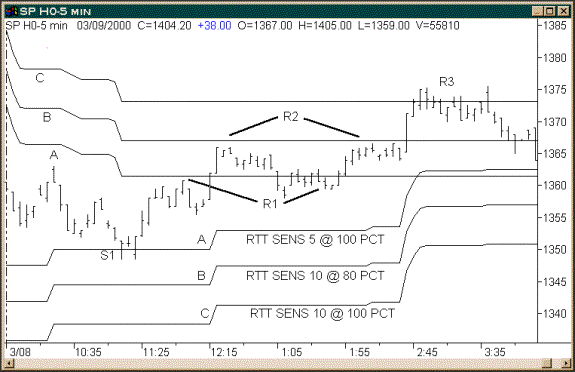
The above chart is a 5-minute bar chart of the S&P futures, where the prior DOW chart was for March 9th, 2000, this S&P chart is for March 8th, 2000.
Like the first DOW
chart, the inputs setting on this S&P chart are a SENS 1 setting of 5 and a
PCT setting of 100.
The indicator is
therefore set to a sensitivity of 5 and is using 100% of the generated
calculation.
The two lines labeled
“A” on this chart are the upper and lower targets plotted by the indicator.
Notice the support
found at S1, the rally from this low and the subsequent resistance/support
experienced at R1.
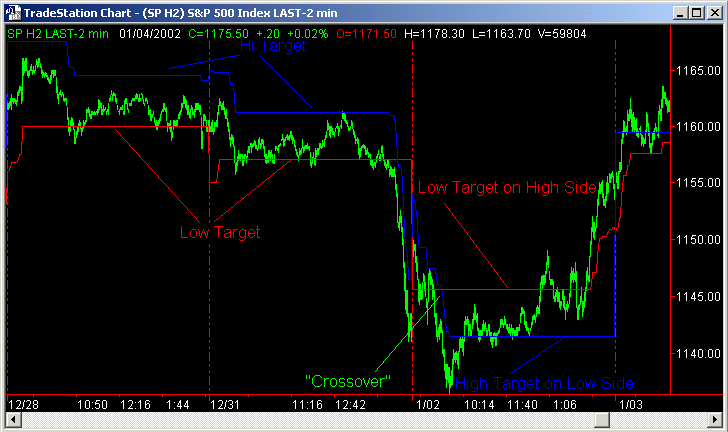
Notice also how at approximately the 2:45 time stamp, how the JFC RTT plot lines cross over. Since these target lines are plotted as a function of their respective distance from the intra-day high and low, on large range days such as this, when the intra-day high is higher than usually experienced, the bottom target line will trail and may cross over the top target line. Interesting is how the crossed over line can then become a new support level.
The above chart is the
same trading day as the first S&P chart example.
Like the second DOW
chart, this chart has the JFC RTT Indicator plotted three times with each plot
using different input settings. They are plotted with Line “A” having the
most sensitive settings and with Line “C” having the least sensitive.
·
The first plot as indicated at line “A” is the same as the
previous chart with a SENS 1 input setting of 5 and the PCT input at 100.
·
The second plot as indicated at line “B” is JFC RTT plotted
with a SENS 1 input setting of 10 and the PCT input at 80.
·
The third plot as indicated at line “C” is JFC RTT plotted with
a SENS 1 input setting of 10 and the PCT input at 100.
Notice how the market also encounters resistance and eventual support at R2 of Line “B” for approximately 140 minutes, after which time the rally continued into the third plot at Line “C”, to find additional resistance at R3.
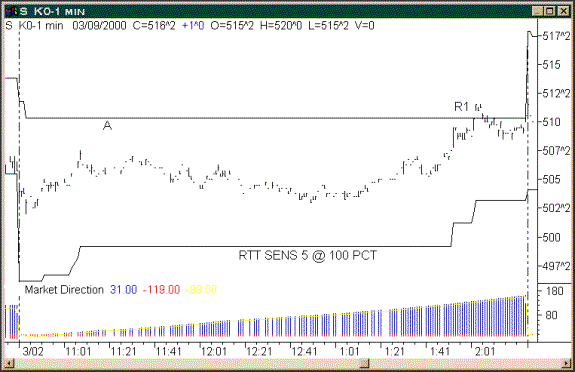
The above chart is a 1-minute bar chart of the May 2000 Soybean Futures Contract.
Like the first chart,
this chart has the JFC RTT applied with the inputs settings of SENS 1 set at 5
and a PCT set at 100.
The indicator is
therefore set to a sensitivity of 5 and is using 100% of the generated
calculation.
The two lines labeled
“A” on this chart are the upper and lower targets plotted by the indicator.
This chart also has the JFC
Market Direction Indicator plotted beneath the price data. Notice how the JFC Market Direction is identifying an UP trend, telling us that the market
therefore has a greater probability of reaching to the top target rather than
trading into the bottom target.
After significant sideways action for most of this session and the JFC Market Direction Indicator continuing to demonstrate more buying pressure than selling pressure, the market then trades upward to find resistance at the top JFC RTT target at R1.
Possible
Issues Encountered using Narrow Sensitivities
When
this indicator is applied to a chart of a comparatively volatile commodity
contract or stock issue using certain sensitivity settings plots can be
displayed that may be confusing when first observed.
If the indicator is applied with a relatively narrow sensitivity, for example, Pct = 70 and Sens = 5 on a chart of the S&P 500 Futures, a phenomenon which I refer to as “crossover” can result. The following chart is an example of this situation.