|
Dr. John F. Clayburg
Parallel User Functions
Use of Parallel Functions in
Self Adaptive Systems
Presented at Omega World '99 May 21 - 23,
1999 Las Vegas, Nevada
Abstract as published in the conference proceedings
DOWNLOAD
a printable file of this document (2.97 MB)
Introduction
This presentation is designed to detail an additional tool which
can be used to make trading systems more self adaptive and therefore more
responsive to current market conditions.
If a system uses back data to any degree it can be regarded as
being self adaptive to one degree or another. Moving averages, standard
deviations, breakouts, neural networks, etc. all rely on some historical
price movement to generate buy and sell signals.
This programming technique takes the self adaptive concept one
step farther by using the system itself to adjust its own trading parameters
for each trade.
I wish to emphasize at the beginning that this is a programming
technique which must be applied in a different manner to each and every
system on which it is used. It is not a canned function or add on program
which can be applied to any system.
Also, since the programming involved in the application of this
technique can be quite involved and extensive, it should be emphasized
that this is not a fix - all for mediocre or poor systems. In fact, it
will probably worsen the results of a poor system since the variables will
constantly be reset to extreme values, making the equity swings of the
system even more pronounced.
Systems which respond best to this technique are those which
are considered robust in nature and remain profitable over a progressive
set of input variables. Such a system should show a bell curve pattern
when the results of an optimization over the critical inputs is performed.
Systems which respond well to frequent optimization will find this technique
useful in improving performance and smoothing out equity curves.
BackTest Regular Optimization
Traders and system developers regularly check variations of their
system against recent back data in an attempt to discover if an underlying
change in the market has effected the performance of their system. Done
properly, this effort can be rewarded with improved system performance
real - time. Improperly done, which is more often the case, frequent re
- optimization leads to a system which is overly curve fitted and more
prone to losses.
The difficulty is knowing how often to optimize, over what system
parameters and how much data should be used for each test. To come up with
the correct testing parameters is a time consuming operation since there
are so many variables to consider. Also, if the testing is to be accurate,
a fairly large volume of past data should be considered.
Through the use of parallel functions, one can set up a group
of indicators which will graphically depict to the user when a significant
change has occurred in the manner in which the system is responding to
changes in market personality. Additionally, if warranted by indicator
observation, the system can be altered to automatically change variable
values when indicated by changes in the market.
In this manner one is able to observe what the results of the
system would have been had re-optimization occurred at regular, defined
intervals over specified input values.
Developmental History
When I began designing systems for currency trading in TradeStation
several years ago I was quick to notice that the optimal variables which
controlled the system equations would vary greatly from one contract month
to another. My initial methodology involved an early range breakout system
for trading the currency markets whereby the system would place breakout
buy or sell stops slightly outside the early market range. Since the definition
of the early range was critical to system performance, variables were used
in the system to set the range by time of day, width of the early range,
and the proximity of the current price to extreme range when the early
range was defined.
It was soon obvious that the best settings for the variables
used to define the critical early range varied significantly from contract
to contract. Even averaging the variables over several contracts produced
only mediocre results. Obviously there was a characteristic somewhere in
the activity of the market that was fluctuating regularly which resulted
in the radical activity of the system. Also obviously, if the system was
to be profitable in the future, I was going to get a handle on the root
of these fluctuations. One could always optimize the variables for each
contract and make the system look like the best thing around but we all
know by now that curve fitting is a quick way to overconfidence and a losing
system.
For months I analyzed every market parameter I could define - gaps,
average daily range, daily open to close, ratios of high to low to open
to close, tendency of a quiet day to follow a wild day, changes of market
activity around big report days, and so on. Although measuring these parameters
and using them to adjust the system variables was of some benefit to system
performance, I was still unable to achieve the consistency across all data
that I desired.
Then one day it dawned on me - the best way to evaluate the market
with respect to a particular system is the system itself! By running the
system against a defined subset of past market data using a defined set
of variables one could constantly monitor the performance of the system
across all variable settings. Properly programmed, the system could constantly
adjust critical variables to reflect optimum performance against recent
market data.
This technique operates in much the same fashion in which the pure
market technician assesses the market. The pure technician ignores all
fundamentals, confident that eventually all forces impacting on the market
will be reflected in price. In much the same way, a parallel user function
ignores all the myriad of technical forces in the market as they impact
the system and concentrates only on the net effect of these changes in
market characteristic on the system itself. Rather than trying to determine
which phase of market activity is impacting the results of the system,
we use the system itself to monitor changes in the market personality and
make system adjustments accordingly.
To accomplish this formidable task I created what I have chosen to
call a parallel user function.
Programming Examples
A parallel function is one which is written to mimic the base system
in every respect. At first this might seem simple, as one could simply
copy the entire system code and save it as a function. However, system
functions such as buy, sell, exitlong, exitshort, marketposition, positionprofit,
are not available for use in functions. You must therefore write your function
to perform as a system without the use of these extremely useful commands.
To clarify and illustrate the usefulness of this technique let's develop
a simple breakout system and the apply the parallel function to the system.
Our system will involve the simple breakout of a range at a given time
early in the trading day. We'll keep track of the high and low of the day
and at a given, input selectable time, we'll place a breakout buy above
the range of the day and a breakout sell below the established range. We'll
then take profit at a user selectable target and set our stop loss, again
with a user selectable value.
Base System
Here's the EasyLanguage code for our system. I'll explain what each
section and then compare the system code with that required for the parallel
function.
Download the .ela code for this system.
Inputs: Delay(45), Tgt(7), Stp(4);
Vars: NuHi(0), NuLo(0), Bpt(0), Spt(0);
If D<>D[1] then begin
NuHi = H;
NuLo = L;
Bpt = 9999999;
Spt = 0;
end;
If H>NuHi then NuHi = H;
If L<NuLo then NuLo = L;
If T = CalcTime(Sess1StartTime,Delay) then begin
Bpt = NuHi +.1;
Spt = NuLo - .1;
end;
If TradesToday(d) = 0 then begin;
BUY Bpt stop;
SELL Spt stop;
end;
If MarketPosition = 1 then begin
Exitlong("L_ TGT") entryprice + tgt limit;
ExitLong("L_Stp") entryprice - Stp stop;
end;
If MarketPosition = -1 then begin
ExitShort("S_Tgt") entryprice - tgt limit;
ExitShort("S_Stp") entryprice + stp stop;
end;
**********
System Code Explanation
The first lines are the input and variable declarations.
"Delay" refers to the number of minutes after the open of the market
that the range determination will be made. In this example, the input is
defaulted to 30, meaning the system will buy or sell the range established
30 minutes after the open of the market. "Tgt" is the objective of the
trade, or "target" price, expressed in points. In this example the target
is two points in the S&P, or $500.00. "Stp" is the value of the
stop loss for the system, in this example, four S&P points.
The variables NuHi and NuLo will track the expanding high and low for
the day. The Bpt and Spt variables will store the calculated buy and sell
points for the system.
Inputs: Delay(30), Tgt(2), Stp(4);
Vars: NuHi(0), NuLo(0), Bpt(0), Spt(0);
Resets. The NuHi and NuLo variables, which progressively record the
high and low for the day as the range expands, are reset to the high
and low of the first bar of the day. The buy point (Bpt) and sell point
(Spt) are reset outside the range of the market to prevent premature
buy and sell signals.
If D<>D[1] then begin
NuHi = H;
NuLo = L;
Bpt = 9999999;
Spt = 0;
end;
These two lines record the high and low for the day as the range expands
and stores them in the NuHi and NuLo variables.
If H>NuHi then NuHi = H;
If L<NuLo then NuLo = L;
This bracket uses the CalcTime function set the breakout time for the
system using the Delay input. The buy point and sell point are set to the
high and low for the day at that time, plus or minus 1 tick, respectively.
If T = CalcTime(Sess1StartTime,Delay) then begin
Bpt = NuHi;
Spt = NuLo;
end;
This is the area of the code which executes the buy and sell orders
for the system, taking only one trade per day. The systems issues orders
to buy one tick above the high or sell one tick below the low of the day.
If TradesToday(d) = 0 then begin;
BUY Bpt stop;
SELL Spt stop;
end;
These next two brackets are the exit routines for the system.
In the first bracket, the system exits a long position at the entry price
plus the target input in the case of a profitable trade or will exit at
the entryprice - the stop input in the case of a stopped out position.
The second bracket exits the short positions in a similar manner, with
profit being taken at the entry price minus the target price and the system
suffering a stopped out loss at the entryprice plus the stop price.
If MarketPosition = 1 then begin
Exitlong("L_ TGT") entryprice + tgt limit;
ExitLong("L_Stp") entryprice - Stp stop;
end;
If MarketPosition = -1 then begin
ExitShort("S_Tgt") entryprice - tgt limit;
ExitShort("S_Stp") entryprice + stp stop;
end;
Programming the Parallel Function
Download the .ela code for this function.
Now, let's detail the programming of the parallel function which must
behave exactly as the system but without the use of the system statements
buy, sell, exitlong and exitshort.
Here's the parallel function, which I've named OMW_BO (for Omega World
Breakout).
Inputs: Delay(numeric), Tgt(numeric), Stp(numeric);
Vars: NuHi(0), NuLo(0), Bpt(0), Spt(0), tt(0), Lng(false), Sht(false);
If D<>D[1] then begin
NuHi = H;
NuLo = L;
Bpt = 9999999;
Spt = 0;
Lng = false;
Sht = false;
Value1 = 0;
tt = 0;
end;
If H>NuHi then NuHi = H;
If L<NuLo then NuLo = L;
If T = CalcTime(Sess1StartTime,Delay) then begin
Bpt = NuHi + .1;
Spt = NuLo - .1;
end;
If H > Bpt and tt = 0 then Lng = true;
If Lng then begin
If L < Bpt - Stp and lng[1] = true then begin
If tt = 0 then Value1 = tgt;
tt = 1;
end;
If L < Bpt - Stp then begin
If tt = 0 then Value1 = -stp;
tt = 1;
end;
If tt = 0 and T = Sess1EndTime then Value1 = C - Bpt;
end;
If L < Spt and tt = 0 then sht = true;
If sht then begin
If L < Spt - tgt then begin
If tt = 0 then Value1 = tgt;
tt = 1;
end;
If H >= Spt + stp and sht[1] = true then begin
If tt = 0 then Value1 = -stp;
tt = 1;
end;
If tt = 0 and T = Sess1EndTime then Value1 = Spt - C;
end;
OMW_BO = Value1;
Now, lets detail the parallel function code, pointing out the changes
necessary to enable the function to perform as a system.
The input declarations are similar, except that the default values are
set up to receive numeric inputs from the indicator / system using this
function.
Inputs: Delay(numeric), Tgt(numeric), Stp(numeric);
In the variables declaration section the first 4 variables are identical.
It is necessary to add three more variables for our function: tt, which
will record total trades, Lng and Sht, which will be reset to true if the
market takes a long "Lng" or short "Sht" position.
Vars: NuHi(0), NuLo(0), Bpt(0), Spt(0), tt(0), Lng(false), Sht(false);
The reset section adds reset lines for the newly added variables as
they will need to store new values for each new day. We also reset value1
to 0 here which stores the ultimate value for the function.
If D<>D[1] then begin
NuHi = H;
NuLo = L;
Bpt = 9999999;
Spt = 0;
Lng = false;
Sht = false;
Value1 = 0;
tt = 0;
end;
The next six lines are identical to the system code.
If H>NuHi then NuHi = H;
If L<NuLo then NuLo = L;
If T = CalcTime(Sess1StartTime,Delay) then begin
Bpt = NuHi + .1;
Spt = NuLo - .1;
end;
Here's where the major changes begin.
The next line tells the function when a long breakout has occurred.
The statement says that if the high of a bar is greater than our buy point
then the market has traded through our buy stop and system is in a long
position. Additionally, since our system is designed to take only one trade
per day, the tt=0 statement will only allow the Lng variable to be set
to true if this is the first time that the high of a bar goes through our
buy point.
If H > Bpt and tt = 0 then Lng = true;
Inside the next bracket we calculate the results of our long trade.
If Lng then begin
The next line is activated when the high of a bar exceeds our
buy point plus our target objective, or when our system has taken a profit
on the long position. If this condition (H > Bpt + Tgt) is true then the
program returns the value of the target for value1 (Value1 = tgt), only
if we are on the first occurrence of the breakout (tt=0). Therefore, the
function will return the value for the target stop when the high of a bar
has exceeded the breakout point plus the target value.
The last line in this bracket (tt = 1) sets the total trades
to 1 which prevents the function from reporting any more values for the
day.
If H > Bpt + Tgt then begin
If tt = 0 then Value1 = tgt;
tt = 1;
end;
The next bracket calculates a function value when the system is
stopped out for a loss. In the same fashion as the bracket above, the function
value is set to the value of the stop loss (stp) when the low of a bar
goes below our buy point minus the stop loss value.
If L < Bpt - Stp and lng[1] = true then begin
If tt = 0 then Value1 = -stp;
tt = 1;
end;
The last line in this bracket returns the result of the system
should we reach the end of the day and the position is liquidated on the
close.
If tt = 0 and T = Sess1EndTime then Value1 = C - Bpt;
end;
The next several lines of the function program calculate the value
for the function in the case of a short position for the system.
If L < Spt and tt = 0 then sht = true;
If sht then begin
If L < Spt - tgt then begin
If tt = 0 then Value1 = tgt;
tt = 1;
end;
If H >= Spt + stp and sht[1] = true then begin
If tt = 0 then Value1 = -stp;
tt = 1;
end;
If tt = 0 and T = Sess1EndTime then Value1 = Spt - C;
end;
The last line assigns to the function the calculated value for
value1.
OMW_BO = Value1;
De Bugging Tips
It's always a good idea to plot the function as an indicator as
you are going through the programming process. Your goal is to program
the function to perform exactly as the base system. Plotting it as an indicator
on the same chart as the system makes the comparison between the function
and the system more manageable.
First, set the system to 0 zero commission and slippage so the
system reports are the actual result of the trade. Also, multiply the point
return for the function by the big point value so the value of the function
will match the return from the system. You can then use the system report
window and the data window to compare the results of the function and the
system. You must be certain to have the inputs identical for the system
and the function. Also, you must use the same Max Bars Back settings -
don't make the mistake of using the auto detect feature for this parameter
on your indicator.
The plot for the indicator should change each time the system
completes a trade. The change in the indicator plot should be idential
to the change inthe system result.
It is important that you check the performance of your function
against every possible trade. For just our simple system, you'll need to
check the accuracy of 5 separate types of trades - the long profit, long
stop out, short profit, short stop out and the end of day exit. It is necessary
to check each trade against the function since their are separate lines
of code for each potential system outcome, all of which could contain errors.
One could logically ask at this point - why not just use the
System Equity Indicator to check the progress of the system? The differences
between the two approaches is that the system equity indicator only measures
the performance of the system currently being run on the chart. Our approach
utilizing the power of the parallel function gives us the flexibility to
check various system settings against each other oer the life of
the chart to get a reading of system behavior under varying market conditions.
Initial Use of the Parallel Function
Now that we've programmed our function let's put it to work evaluating
our system on a day by day basis.
The first use of the function should be as an indicator which
plots multiple versions of the system. Here's the code for an indicator
which plots the progressive results of our system using 8 different profit
target levels. Obviously, you would need to write two separate indicators
with 4 plots each to display all 8 system configurations as only 4 plots
per indicator are allowed.
Normally when one plots a function in an indicator you would
supply all the function inputs using indicator inputs. However, in this
particular instance, we will be entering different values in the indicator
programming so that several variations of our system outputs will be displayed.
Later I will illustrate a more complex indicator in which all variations
of the system can be plotted using multiple inputs.
In this indicator we're using two arrays ("Bsys" and "BsysT"
) to store the results of the various system variations as the function
generates results for each day on the chart.
Note, in the 8 lines immediately following the array declarations,
that we use a separate function call for each system variation and store
it in a separate array position. For each function call, the delay and
stop inputs remain static, using the input supplied values. In this example
I have entered values 5 through 12 for the target input. This has the result
of calculating the results of our system for 8 different profit targets
each day.
The next 8 lines simply increment the proper array positions
in the BsysT array each time the function calculates a new value for each
system variation.
Download the .ela code for this indicator.
Input: DELAY(45),STP(4);
Arrays: BSys[8](0), BSysT[8](0);
BSys[1] = OMW_BO(DELAY,5,STP);
BSys[2] = OMW_BO(DELAY,6,STP);
BSys[3] = OMW_BO(DELAY,7,STP);
BSys[4] = OMW_BO(DELAY,8,STP);
BSys[5] = OMW_BO(DELAY,9,STP);
BSys[6] = OMW_BO(DELAY,10,STP);
BSys[7] = OMW_BO(DELAY,11,STP);
BSys[8] = OMW_BO(DELAY,12,STP);
If BSys[1] <> Bsys[1][1] then BSysT[1] = BSysT[1] + BSys[1];
If BSys[2] <> Bsys[2][1] then BSysT[2] = BSysT[2] + BSys[2];
If BSys[3] <> Bsys[3][1] then BSysT[3] = BSysT[3] + BSys[3];
If BSys[4] <> Bsys[4][1] then BSysT[4] = BSysT[4] + BSys[4];
If BSys[5] <> Bsys[5][1] then BSysT[5] = BSysT[5] + BSys[5];
If BSys[6] <> Bsys[6][1] then BSysT[6] = BSysT[6] + BSys[6];
If BSys[7] <> Bsys[7][1] then BSysT[7] = BSysT[7] + BSys[7];
If BSys[8] <> Bsys[8][1] then BSysT[8] = BSysT[8] + BSys[8];
Plot1(BSysT[1],"BSys1");
Plot2(BSysT[2],"BSys2");
Plot3(BSysT[3],"BSys3");
Plot4(BSysT[4],"BSys4");
Plot1(BSysT[5],"BSys5");
Plot2(BSysT[6],"BSys6");
Plot3(BSysT[7],"BSys7");
Plot4(BSysT[8],"BSys8");
Now we're ready to plot our indicator and view the results. It
will be necessary to plot two indicators, as mentioned above. Plot both
in the same subgraph, choosing a different color for each plot. It is also
necessary to set the scaling of both indicators to the same user - defined
parameters to assure all plots can be compared to each other on an equal
basis.
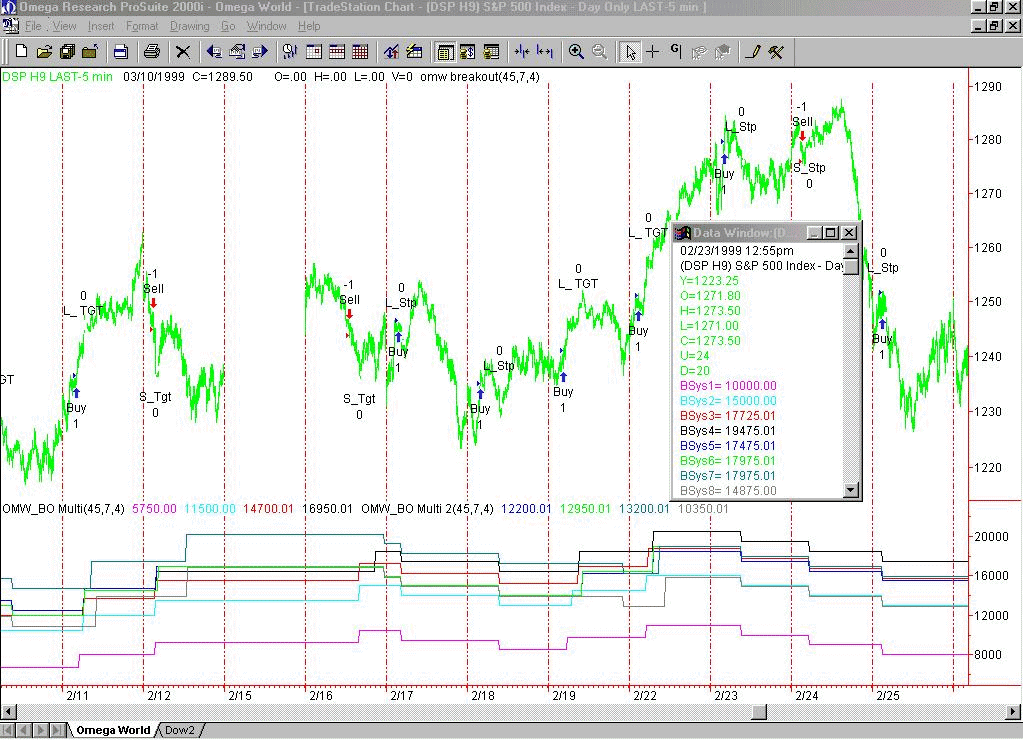
In the chart above you will see the results of our indicator. On this
example the system settings are for a 7 point profit target while using
a 4 point stop.
The results for each of our 8 system settings are displayed as a separate
tracing in subgraph two of the chart, each with a different color. Remember
that we are only varying the system in the indicator by a single parameter,
the profit target for the system.
Bsys1 = 5 point objective; Bsys2 = 6 point objective; Bsys3 = 7 point
objective; Bsys4 = 8 point objective; (black) Bsys5 = 9 point objective;
Bsys6 = 10 point objective; Bsys7 = 11 point objective; Bsys8 = 12 point
objective;
With that in mind, note how the indicator positions change along with
the system exits. Also, note that there is considerable difference in performance
across all settings of the system as displayed by our indicator. It is
of particular interest to note the indicator patterns on days when some
system settings would have been profitable and some would have had losses.
For instance, look at the results on 2/16. The system sold the market
at 1243.90 on a stop and took profit 7 points lower at 1236.90. Note that
the indicator tracings representing profit objectives of 7 points or less
also took a profit while those with greater objectives recorded losses
when that system setting was stopped out at the 4 point stop loss point.
A similar pattern emerges on 2/19 when two of the simulated systems
took losses when the market failed to reach their greater objectives, pulled
back and eventually stopped these options out near the end of the day.
Although it is not evident on this small snapshot of the system screen,
the most absorbing observation is to watch the different systems gain and
lose to each other as the days progress. While it is not always evident
what changes are taking place in the market to cause these variations,
it becomes readily evident when there is a change in market personality
developing. Again, recall that we are only measuring a single variable
of system performance, that of our profit target. When other parameters
such as time of breakout and the stop loss level are also included the
variations of system performance become more dramatic and subsequently
more revealing of the response of the system to the underlying market activity.
The next step is to construct similar indicators for the other two
parameters, namely the delay input and the stop input. It is then possible
to assess each input over 8 different settings dynamically as the chart
moves along.
Finally, we'll construct an indicator with user selectable inputs for
each parameter so the user can construct up to 4 system following plots
based on the results of the observations of the first 3 indicators.
Below is the code for out indicator which will plot 8 different system
simulations for the delay input in the system. Note that we provide user
selectable inputs for the starting value of the delay period as well as
an incremental factor (Delay_Inc) for the input, in much the same fashion
that is used when one does an optimization.
Note that the code below calls our parallel function for each of the
8 simulations of the system, providing an input for the delay factor which
starts with the beginning value (Delay_Start) and increments each
Download the .ela code for this indicator.
Input: Delay_Start(30),Delay_Inc(5),Tgt(5),Stp(4);
Vars: Pts(0), TTlPts(0);
Arrays: BSys[8](0), BSysT[8](0);
BSys[1] = OMW_BO(Delay_Start + (Delay_Inc*0),Tgt,Stp);
BSys[2] = OMW_BO(Delay_Start + (Delay_Inc*1),Tgt,Stp);
BSys[3] = OMW_BO(Delay_Start + (Delay_Inc*2),Tgt,Stp);
BSys[4] = OMW_BO(Delay_Start + (Delay_Inc*3),Tgt,Stp);
BSys[5] = OMW_BO(Delay_Start + (Delay_Inc*4),Tgt,Stp);
BSys[6] = OMW_BO(Delay_Start + (Delay_Inc*5),Tgt,Stp);
BSys[7] = OMW_BO(Delay_Start + (Delay_Inc*6),Tgt,Stp);
BSys[8] = OMW_BO(Delay_Start + (Delay_Inc*7),Tgt,Stp);
If BSys[1] <> Bsys[1][1] then BSysT[1] = BSysT[1] +
BSys[1];
If BSys[2] <> Bsys[2][1] then BSysT[2] = BSysT[2] +
BSys[2];
If BSys[3] <> Bsys[3][1] then BSysT[3] = BSysT[3] +
BSys[3];
If BSys[4] <> Bsys[4][1] then BSysT[4] = BSysT[4] + BSys[4];
If BSys[5] <> Bsys[5][1] then BSysT[5] = BSysT[5] +
BSys[5];
If BSys[6] <> Bsys[6][1] then BSysT[6] = BSysT[6] +
BSys[6];
If BSys[7] <> Bsys[7][1] then BSysT[7] = BSysT[7] +
BSys[7];
If BSys[8] <> Bsys[8][1] then BSysT[8] = BSysT[8] +
BSys[8];
Plot1(BSysT[1],"Delay1");
Plot3(BSysT[3],"Delay2");
Plot2(BSysT[2],"Delay3");
Plot4(BSysT[4],"Delay4");
Plot1(BSysT[5],"Delay5");
Plot2(BSysT[6],"Delay6");
Plot3(BSysT[7],"Delay7");
Plot4(BSysT[8],"Delay8");
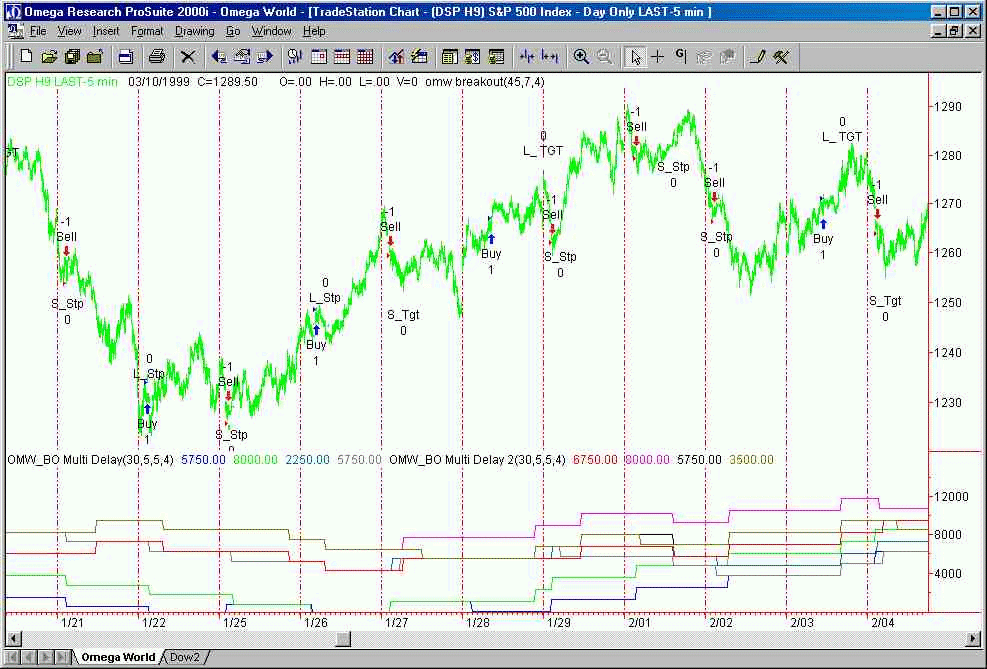
The indicator on the above chart depicts graphically the results of
8 simulations of our system as plotted by the parallel function. The tracings
depict the results of the system over 8 different breakout times as entered
into the indicator by the function calls. The initial input of a 30 minute
delay is incremented by the input factor of 5 for each successive simulated
plot. Thus, plot Delay1 reflects the system with a breakout time 30 minutes
after the open. Delay2 plots the system with a 35 minute delay, Delay3
equals a 40 minute delay, etc. Again, note the variations evident between
the different system simulations. Although the purple tracing, representing
a system simulation with a breakout of the range established 55 minutes
after the open, is the superior setting at this particular time, examination
of the remainder of the chart will demonstrate that other settings are
superior at other times. Note how several of the simulations continually
compete with each other for the best performance. By plotting several indicators
on chart, each representing simulations of several settings of different
system parameters, the system developer or trader can get a graphic representation
of the behavior of the system under constantly changing market conditions.
 |
|
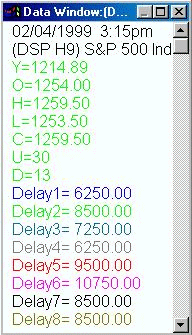
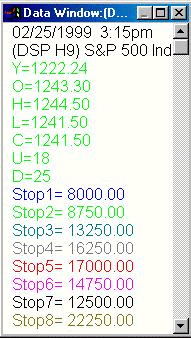
The data window at right depicts the results of all 8 systems simulated
in the chart above. Being aware of the settings in the indicator inputs,
we know that Delay 1 represents a breakout of a range established 30 minutes
after the market open. Each successive simulation represents a breakout
range set up 5 minutes later than the preceding graphic. All other system
parameters, the target and stop, remain static so
the system can be measured accurately with the breakout range
time being the only variable which is responsible for the changes in the
system reports in the window at right.The numbers reported in the data
window are the actual dollar amounts which would have been generated by
the system under each progressively incremented breakout time setting. |
The indicator code below is identical to the previous program with the
only exception being that the stop parameter of the system is being increased
incrementally for each system simulation. The stop settings begin at 4
points, as determined by the input, and are increased by the Stop_Inc amount
for each successive function call.
Input: Delay(45),Tgt(5),Stp_Start(4), Stop_Inc(1);
Vars: Pts(0), TTlPts(0);
Arrays: BSys[8](0), BSysT[8](0);
BSys[1] = OMW_BO(Delay,Tgt,Stp_Start + (Stop_Inc*0));
BSys[2] = OMW_BO(Delay,Tgt,Stp_Start + (Stop_Inc*1));
BSys[3] = OMW_BO(Delay,Tgt,Stp_Start + (Stop_Inc*2));
BSys[4] = OMW_BO(Delay,Tgt,Stp_Start + (Stop_Inc*3));
BSys[5] = OMW_BO(Delay,Tgt,Stp_Start + (Stop_Inc*4));
BSys[6] = OMW_BO(Delay,Tgt,Stp_Start + (Stop_Inc*5));
BSys[7] = OMW_BO(Delay,Tgt,Stp_Start + (Stop_Inc*6));
BSys[8] = OMW_BO(Delay,Tgt,Stp_Start + (Stop_Inc*7));
If BSys[1] <> Bsys[1][1] then BSysT[1] = BSyst[1] + BSys[1];
If BSys[2] <> Bsys[2][1] then BSysT[2] = BSyst[2] + BSys[2];
If BSys[3] <> Bsys[3][1] then BSysT[3] = BSyst[3] + BSys[3];
If BSys[4] <> Bsys[4][1] then BSysT[4] = BSyst[4] + BSys[4];
If BSys[5] <> Bsys[5][1] then BSysT[5] = BSyst[5] + BSys[5];
If BSys[6] <> Bsys[6][1] then BSysT[6] = BSyst[6] + BSys[6];
If BSys[7] <> Bsys[7][1] then BSysT[7] = BSyst[7] + BSys[7];
If BSys[8] <> Bsys[8][1] then BSysT[8] = BSyst[8] + BSys[8];
Plot1(BSysT[1]*250,"Stop1");
Plot2(BSysT[2]*250,"Stop2");
Plot3(BSysT[3]*250,"Stop3");
Plot4(BSysT[4]*250,"Stop4");
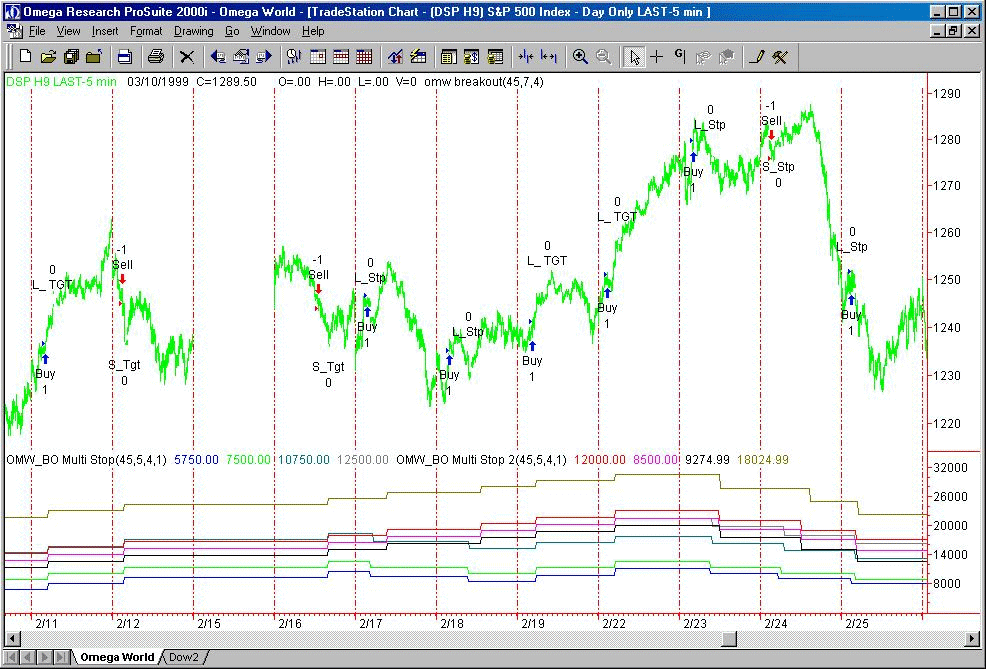
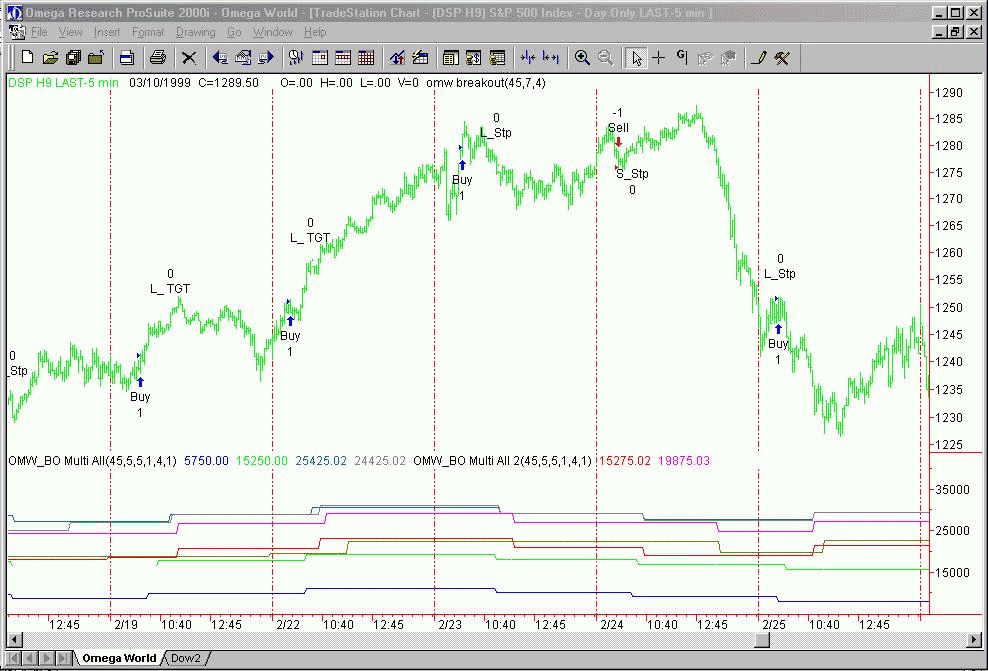
The indicator on chart above represents the results of the system using
8 progressively incremented settings for the stop input. As before, the
inputs for the other two parameters are held static so the graphs are representative
of the system changes as effected only by the changing stop input.
 |
|
As with the delay input indicator, the data window on the right reports
the system results under 8 different settings for the stop parameter of
our system.At this point on the chart the stop setting with the highest
value, or 11 points, is giving the best system results with the delay input
frozen at 45 minutes after the open and the target for the system set at
5 points. |
Putting It All Together
Now that we’ve completed the parallel function and given a few examples
of its operation on selected system inputs, lets put the indicator portion
of the puzzle together in a form which will allow more thorough system
testing.
The code below allows 3 inputs for all three critical variables of
the system – delay, target and stop. The inputs allow the user to select
a starting value for each variable from which the system analysis will
begin. An incremental value can also be entered for each variable allowing
the indicator to calculate 8 simulations for each variable.
By observing the individual plots for delay, target and stop the user
now has a fairly good idea of which settings are going to be best for the
optimal performance of the system, but up to now has not been able to observe
the multiple system analysis across all inputs. With this next step, the
user can enter a range of settings for each variable according to the observations
from the previous indicator plots and then observe indicator readings representative
of the total system using a varied range of variable inputs.
Input: Delay_Start(45),Delay_Inc(5),Tgt_Start(5),Tgt_Inc(1),Stp_Start(4),
Stop_Inc(1);
Vars: Pts(0), TTlPts(0);
Arrays: BSys[8](0), BSysT[8](0);
BSys[1] = OMW_BO(Delay_Start + (Delay_Inc*0),Tgt_Start + (Tgt_Inc*0),Stp_Start
+ (Stop_Inc*0));
BSys[2] = OMW_BO(Delay_Start + (Delay_Inc*1),Tgt_Start + (Tgt_Inc*1),Stp_Start
+ (Stop_Inc*1));
BSys[3] = OMW_BO(Delay_Start + (Delay_Inc*2),Tgt_Start + (Tgt_Inc*2),Stp_Start
+ (Stop_Inc*2));
BSys[4] = OMW_BO(Delay_Start + (Delay_Inc*3),Tgt_Start + (Tgt_Inc*3),Stp_Start
+ (Stop_Inc*3));
BSys[5] = OMW_BO(Delay_Start + (Delay_Inc*4),Tgt_Start + (Tgt_Inc*4),Stp_Start
+ (Stop_Inc*4));
BSys[6] = OMW_BO(Delay_Start + (Delay_Inc*5),Tgt_Start + (Tgt_Inc*5),Stp_Start
+ (Stop_Inc*5));
BSys[7] = OMW_BO(Delay_Start + (Delay_Inc*6),Tgt_Start + (Tgt_Inc*6),Stp_Start
+ (Stop_Inc*6));
BSys[8] = OMW_BO(Delay_Start + (Delay_Inc*7),Tgt_Start + (Tgt_Inc*7),Stp_Start
+ (Stop_Inc*7));
If BSys[1] <> Bsys[1][1] then BSysT[1] = BSyst[1] + BSys[1];
If BSys[2] <> Bsys[2][1] then BSysT[2] = BSyst[2] + BSys[2];
If BSys[3] <> Bsys[3][1] then BSysT[3] = BSyst[3] + BSys[3];
If BSys[4] <> Bsys[4][1] then BSysT[4] = BSyst[4] + BSys[4];
If BSys[5] <> Bsys[5][1] then BSysT[5] = BSyst[5] + BSys[5];
If BSys[6] <> Bsys[6][1] then BSysT[6] = BSyst[6] + BSys[6];
If BSys[7] <> Bsys[7][1] then BSysT[7] = BSyst[7] + BSys[7];
If BSys[8] <> Bsys[8][1] then BSysT[8] = BSyst[8] + BSys[8];
Plot1(BSysT[1]*250,"Best1");
Plot2(BSysT[2]*250,"Best2");
Plot3(BSysT[3]*250,"Best3");
Plot4(BSysT[4]*250,"Best4");
{end;}
The chart above identifies the results of simulated testing across all
three system variables, each with its own starting value and incremental
values.
 |
|
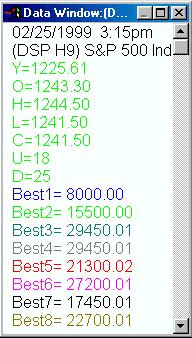
The box at right lists the results of each of our 8 system simulations
as of the date at the top of the window. Each is color coded to one of
the plots in the above chart.By being aware of the inputs for the indicator,
one can graphically determine which settings were optimal for the system
at any one given time through the course of the chart.For instance, on
the date shown, 2-25-99, the magenta simulation, reflecting system settings
of 75, 11 and 10 for delay, target and stop respectively, is showing
the best overall net profit for the system with a net of $29,450 for the
period beginning 1-5-99.It is also obvious from the results presented that
the system we have developed here meets our criteria of a robust system
as the results of a wide array of variable settings produce a smooth progression
of values. Note that there are no settings which greatly outdistance any
of the others, assuring us that the system results are not the result of
one system setting catching a huge trade which accounts for the majority
of the profits for the system. |
The Final Step
Now that we’ve demonstrated the capabilities of a parallel function,
the next step is to develop an automated system to take advantage of these
functions.
Our goal is to create a system which will use parallel functions to
constantly adjust its trading patterns in response to the ever changing
personality of the market. In a sense, these systems could be thought of
as self optimizing.
The programming here is based around the use of loops and arrays to
test all the available options of inputs as selected by the user. It is
also possible to restrict the self testing by the system to a set parameter,
such as the number of days, number of trades, etc. For instance one could
self – optimize the system for the last 30 days, the last 10 trades, the
last 5 winning trades, etc. The possibilities for self testing are limited
only by ones imagination once the parallel function is created.
In all cases, it is possible to program the system to test itself against
a pre defined set of back data and, after determining the optimal set of
variables for the current period, install these variable sets into the
system equations so that they will be used for the next trade.
The advent of TradeStation 2000i has broadened the scope of this technique
exponentially with the ability to manipulate arrays from within a user
function and the elimination of the 64 K file size for system code. As
time goes on we will no doubt find expanded uses for parallel functions
with the vastly increased capability offered by 2000i.
Summary
Parallel functions can be a useful tool for both system development
and testing.
The ultimate use for this tool is found in the creation of systems
which are ultimately self adaptive in that they can use their own reaction
to current market conditions to change their trading parameters on the
fly.
It cannot be emphasized enough that this technique is by no means a
fix – all for a mediocre or poor system. In fact, it will probably decrease
the performance of such a system.
In the final analysis, the user will find this technique useful as
an additional tool to make his or her trading more reactive to current
market conditions.
|